| Joystick-To-Mouse: for Windows; Run Windows with a Joystick!; Version 2.80 Release 6; User's Guide | ||
|---|---|---|
| Prev | Chapter 4. Advanced Menu Options | Next |
Click on a control or button for detailed help, or review descriptions below.
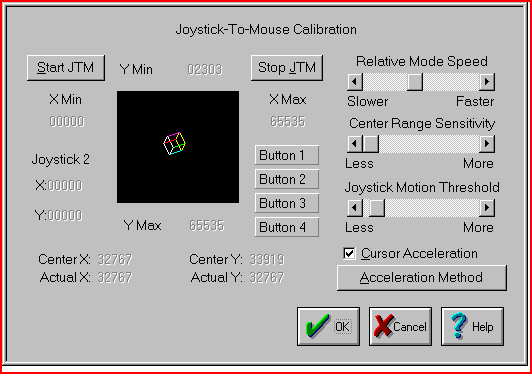
The Joystick-To-Mouse Custom Calibration Screen does not affect the physical calibration of the Joystick in any way. It does not replace the Standard Windows Calibration Method. It allows troubleshooting, technical support assistance, and Advanced users a way to customize various Joystick-To-Mouse settings to improve the Joystick "Feel" as it controls the cursor.
Calibration Process
There are 3 steps in this Calibration Process - note the rotating cube indicates the reported position of the Joystick - for a centered Joystick, the cube should be at the center of the black square.
Step 1 - Move the Joystick through its complete range of motion several times. This establishes the extreme values reported from the Joystick driver to Joystick-To-Mouse. These values are displayed for reference. Once completed, press a Joystick Button to continue.
Step 2 - Center the Joystick & Adjust Trim controls. When you let go of the Joystick, it should return to its centered position. The cube should be near the center of the black square. The Actual reported values (Actual X & Actual Y) are shown below the calculated Center values (Center X & Center Y). Most Joysticks have slider or wheel Trim Controls which allows you to fine tune the values reported from the Joystick. By moving these and observing their affect on the Actual values, you will be able to improve the Joystick response within the system.
IMPORTANT NOTE: It is not necessary to match the Calculated Center values with the Actual values exactly! In most cases, it is impossible! Do the best you can, and then adjust Center Range Sensitivity or Joystick Motion Threshold to remove any drift of the cursor.
Once completed, press a Joystick Button to continue.
Step 3 - Test the Joystick button to determine the named references & their physical location on the Joystick (i.e. which Joystick button is Button 1, which is Button 2, etc.). Then the user may modify the settings, the acceleration method, and test the new configuration immediately. Once the settings are acceptable, select OK to close the Window.
Start JTM
Select this button to Start Joystick Operation (Joystick-To-Mouse ON).
Stop JTM
Select this button to SStop Joystick operation (Joystick-To-Mouse OFF).
Rotating Cube
The Cube indicates the reported position of the Joystick. For a Centered Joystick, the Cube should be at, or near the Center of the black square. As the Joystick is moved off-center, the position of the cube should reflect the motion.
X Min / Y Min
These values indicate the lowest value recorded for horizontal & vertical motion reported from the Joystick.
X Max / Y Max
These values indicate the highest value recorded for horizontal & vertical motion reported from the Joystick.
Joystick 2
These values indicate reported values of Joystick 2 (or other values reported at the Game Port from other devices which correspond to the Joystick 2 inputs).
Center X / Center Y
These are the calculated Center Values [e.g. ((X Max - X Min) / 2)] for the X & Y Minimum & Maximum values recorded to be used as a guide when adjusting the trim controls on your Joystick.
Actual X / Actual Y
These are the current values reported from the driver to Joystick-To-Mouse.
Button 1 / Button 2 / Button 3 / Button 4
After Step 1 & Step 2 are completed, these buttons indicate the state of the Joystick Buttons reported at the Game Port. If the button is pressed on the Joystick, the corresponding button will be displayed in the depressed state. They can be used to reference which name (i.e. Button 1, Button 2, etc.) corresponds to which button on your Joystick.
Relative Mode Speed
This setting allows you to select the speed (from Low to High). This only will affect the mouse cursor motion when operating in the Relative Mode. The speed setting affects the cursor motion differently if Acceleration is enabled. The setting ranges from a Low of Speed 1 to a High of Speed 10.
Center Range Sensitivity
The setting affects how far off-center the Joystick must be to begin registering speed values for the Cursor motion (i.e. when the Joystick is centered, the Cursor should not move - its speed is 0). The higher the value, the further off-center the Joystick must be moved to begin cursor movement.
Joystick Motion Threshold
This setting affects the ability of the driver to report new Joystick values to Joystick-To-Mouse. If the value is low, then even the slightest motion of the Joystick will generate new values. If the value is high, then the Joystick will need to be moved further to generate a new values. If too low, spurious motion may result, and if too high, it may require jerk-like motion to generate a new value. From one point of view, this could be considered Joystick sensitivity, and its proper adjustment could greatly improve the usability of Joystick-To-Mouse.
Cursor Acceleration
If this option is checked, then Acceleration is enabled, and the selected Acceleration Method is used. If this option is off, then no Acceleration is used.
Acceleration Method
This button displays the Acceleration Method selection screen.
As seen in ...
