| Joystick-To-Mouse: for Windows; Run Windows with a Joystick!; Version 2.80 Release 6; User's Guide | ||
|---|---|---|
| Prev | Chapter 4. Advanced Menu Options | Next |
This is an Advanced Setting Option.
Click on a control or button for detailed help, or review descriptions below.
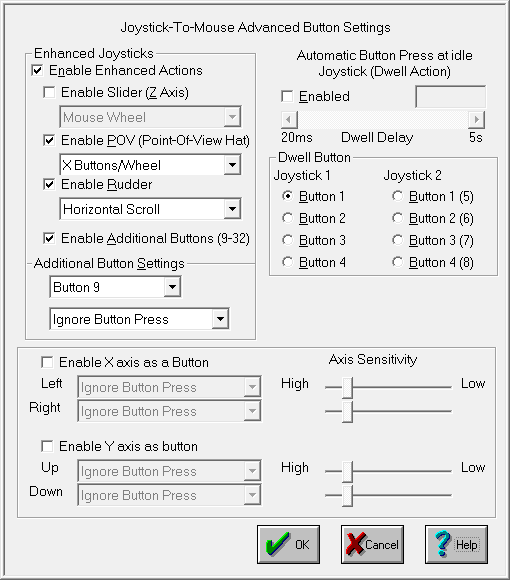
Enhanced Joysticks include flight controllers, driving wheels, pedals, etc. They may contain additional controls, and have up to 32 buttons. This section has options to enable & select various actions for these enhanced controls.
Enable Enhanced Actions
This is the setting that controls the Joystick-To-Mouse monitoring of all of these enhanced actions. By default it is Enabled. You may clear the check box and Disable all monitoring of these controls. This setting must be On (Enabled) to monitor some or all of these controls. This setting MUST be On to work with Buttons 5-32, Z-Axis, the Rudder, POV, etc.
Enable Slider (Z Axis)
This control is sometimes referred to as a slider, throttle, or the Z Axis. It is important to note that sometimes the Z axis & Rudder controls have their names swapped within the joystick driver or in a particular game. For Joystick-To-Mouse, this setting refers to the control on your joystick that creates joystick messages which are sent as Z Axis joystick motion messages - whichever control on your joystick creates these messages is the control that this setting affects. In other words, if the naming in the control panel applet conflicts with the names in Joystick-To-Mouse, don't worry too much about it, but be aware of which control on your joystick this setting affects.
When Enabled, use the drop-down selection box to select which action the control will have.
The following actions are available:
NOTE: For all these actions, moving the control slowly generates more events than moving quickly - see below for further details.
Horizontal Scroll
When an application has a horizontal scroll bar (along the bottom of the window), this setting will allow you to scroll left or right by moving the control. If there is no horizontal scroll bar, then no actions will occur.
Vertical Scroll
When an application has a vertical scroll bar (along the side of the window), this setting will allow you to scroll up or down by moving the control. If there is no vertical scroll bar, then no actions will occur.
Mouse Wheel
This will generate Mouse Wheel Up and Down motion as the control is moved.
Fine Tune X Position
This will move the cursor left or right as the control is moved.
Fine Tune Y Position
This will move the cursor up or down as the control is moved.
Mouse Wheel (+ Auto)
This is the same as the Mouse Wheel, but when the limit is reached, movement will automatically continue in the same direction. Note that some joysticks have problems with this setting and will automatically drift when this control is untouched - if you experience this, do not use the + Auto setting.
Fine Tune X (+Auto)
This is the same as the Fine Tune X Position, but when the limit is reached, movement will automatically continue in the same direction. Note that some joysticks have problems with this setting and will automatically drift when this control is untouched - if you experience this, do not use the + Auto setting.
Fine Tune Y (+Auto)
This is the same as the Fine Tune Y Position, but when the limit is reached, movement will automatically continue in the same direction. Note that some joysticks have problems with this setting and will automatically drift when this control is untouched - if you experience this, do not use the + Auto setting.
All of these controls use a relative motion approach to trigger the selected action. Because various joysticks have different capabilities & precision, you will find that in use, moving the control very slowly will generate more motion then a sudden quick movement. Because these controls have limits (unlike a wheel), there will be a point where you can no longer go in the same direction - to reset, quickly move the control to the opposite extreme, then continue in the same direction by a slow & steady motion. This approach was adopted to allow additional capabilities while using these settings (i.e. a slider is not a wheel, and the physical limits of the device must be accepted (to keep your joystick in good working order!)).
There is a known operational issue with the Z-Axis - see Joystick-To-Mouse Operation for more details.
Enable POV
This Enables monitoring of the POV hat (Point-Of-View thumb control on flight controllers). When Enabled, the following mappings occur within Joystick-To-Mouse:
Wheel / X Buttons
POV Up (270 degrees) sends Mouse Wheel Up motion (as if you are scrolling the Mouse Wheel up)
POV Down (90 degrees) sends Mouse Wheel Down motion (as if you are scrolling the Mouse Wheel down)
POV Left (135, 180, 225 degrees) sends X1 button (Backward)
POV Right (315, 0, 45 degrees) sends X2 button (Forward)
X Buttons / Wheel
POV Up (270 degrees) sends X1 button (Backward)
POV Down (90 degrees) sends X2 button (Forward)
POV Left (135, 180, 225 degrees) sends Mouse Wheel Down motion (as if you are scrolling the Mouse Wheel down)
POV Right (315, 0, 45 degrees) sends Mouse Wheel Up motion (as if you are scrolling the Mouse Wheel up)
Arrow Keys
POV Up (270 degrees) Up Arrow Key
POV Down (90 degrees) Down Arrow Key
POV Left (135, 180, 225 degrees) Left Arrow Key
POV Right (315, 0, 45 degrees) Right Arrow Key
Windows 8 Notes: For some applications, the Wheel / X Buttons option will work better than the default X Buttons/ Wheel option, however the Start Screen, Tiles, and Windows Store are more in tune with the default option.
Enable Rudder
This control is sometimes referred to as the Rudder control, or the Z Axis. It is important to note that sometimes the Z axis & Rudder controls have their names swapped within the joystick driver or in a particular game. For Joystick-To-Mouse, this setting refers to the control on your joystick that creates joystick values which are read when the Rudder position is queried within Windows - whichever control on your joystick changes these values is the control that this setting affects. In other words, if the naming in the control panel applet conflicts with the names in Joystick-To-Mouse, don't worry too much about it, but be aware of which control on your joystick this setting affects.
When Enabled, use the drop-down selection box to select which action the control will have.
The following actions are available:
NOTE: For all these actions, moving the control slowly generates more events than moving quickly - see below for further details.
Horizontal Scroll
When an application has a horizontal scroll bar (along the bottom of the window), this setting will allow you to scroll left or right by moving the control. If there is no horizontal scroll bar, then no actions will occur.
Vertical Scroll
When an application has a vertical scroll bar (along the side of the window), this setting will allow you to scroll up or down by moving the control. If there is no vertical scroll bar, then no actions will occur.
Mouse Wheel
This will generate Mouse Wheel Up and Down motion as the control is moved.
Fine Tune X Position
This will move the cursor left or right as the control is moved.
Fine Tune Y Position
This will move the cursor up or down as the control is moved.
Mouse Wheel (+ Auto)
This is the same as the Mouse Wheel, but when the limit is reached, movement will automatically continue in the same direction. Note that some joysticks have problems with this setting and will automatically drift when this control is untouched - if you experience this, do not use the + Auto setting.
Fine Tune X (+Auto)
This is the same as the Fine Tune X Position, but when the limit is reached, movement will automatically continue in the same direction. Note that some joysticks have problems with this setting and will automatically drift when this control is untouched - if you experience this, do not use the + Auto setting.
Fine Tune Y (+Auto)
This is the same as the Fine Tune Y Position, but when the limit is reached, movement will automatically continue in the same direction. Note that some joysticks have problems with this setting and will automatically drift when this control is untouched - if you experience this, do not use the + Auto setting.
All of these controls use a relative motion approach to trigger the selected action. Because various joysticks have different capabilities & precision, you will find that in use, moving the control very slowly will generate more motion then a sudden quick movement. Because these controls have limits (unlike a wheel), there will be a point where you can no longer go in the same direction - to reset, quickly move the control to the opposite extreme, then continue in the same direction by a slow & steady motion. This approach was adopted to allow additional capabilities while using these settings (i.e. a slider is not a wheel, and the physical limits of the device must be accepted (to keep your joystick in good working order!)).
Enable Additional Buttons
This is a setting that affects Buttons 9 - 32. It must be On to Enable monitoring of these additional buttons. Note that if your joystick has eight buttons or less, then this setting has no effect whether Enabled or Disabled.
Additional Buttons Settings
This area has a drop-down selection box to select which button you wish to modify, and then a second drop-down selection box with button settings. To modify a particular button, select it in the top drop-down selection box, and then select this button's setting in the bottom drop-down selection box. For a list of button settings, see Button Settings Advanced.
Automatic Button Press at idle Joystick (Dwell Action)
This option only applies to Relative Mode operation.
If this option is Enabled, then the following happens: Any joystick motion enables a button press after the joystick is idle (at the center position) for the delay period. In use, this means that the user will move the mouse cursor to a position, and return the Joystick to the center position, then the delay period will begin. If there is no motion (Joystick remains at center position) during the delay period, a button press will be sent at the end of the delay period.
The Delay period can be set from a very brief 20 ms (0.02 seconds) to 5 seconds in 20 ms increments. The default value is 1/5 seconds (0.20 seconds). Note that in older versions of Windows the delay may be slower than indicated due to lack of precision in the system timers available in those versions.
Dwell Button
By default, the Dwell Button (i.e. the Button Press that is sent when the Dwell Action is Enabled and the dwell period has expired after Joystick motion) is set to Button 1 on Joystick 1. This area allows you to reconfigure which Joystick-To-Mouse Button setting is triggered after the dwell period has expired.
NOTE: The button settings act independently of the selected joystick - therefore you may actually have up to 8 different button actions available with proper hardware. Note that the physical Game Port only supports 4 button inputs - more than 4 would require special software and/or hardware to interface with the Joystick driver.
Enable X Axis as button
Enable Y Axis as button
When enabled, these allow you to transform X/Y axis motion into button actions (e.g. Driving Wheels/Pedals, etc.). You have the option of selecting the same or 2 different button actions based on direction (e.g. forward/backward / left/right), and you can set the sensitivity that triggers this button action for each direction.
As seen in ...
