| OnScreen with CrossScanner: for Windows; OnScreen Keyboards with Single Switch Access; Version 1.79; User's Guide | ||
|---|---|---|
| Prev | Chapter 5. OnScreen Setup | Next |

Click on the User Options Button.
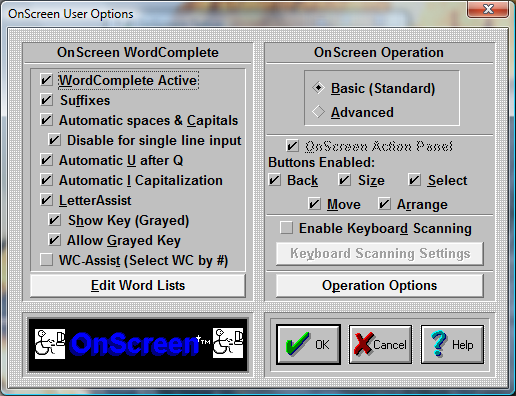
OnScreen lets you set operational preferences within User Options
OnScreen WordComplete
WordComplete Active
WordComplete is an adaptive word-prediction / completion method that allows much faster typing by automatically offering the most likely word candidates as words are being typed.
By selecting WordComplete Active with the Check-Button, you open the WordComplete Panel, and you activate its operation within OnScreen. When Active, Suffixes, Automatic spaces & Capitals, Automatic U after Q, Automatic I Capitalization, and Edit Word Lists Button become available.
Note: If OnScreen with CrossScanner is configured to a size larger than 12, and WordComplete Active will be disabled. You must run OnScreen with CrossScanner, resize down to size 12, then return to User Options to access this option. Once changed, you can resize OnScreen with CrossScanner up to the desired size.
Suffixes
By selecting Suffixes with the Check-Button you enable the suffix portion within WordComplete. Upon a word's completion, you are presented with a selection of suffixes that can be used to complete the word. Suffixes may also be selected anytime during the entry of a word. The most common suffixes are included, and may be modified if necessary (See Advanced User Notes for further information).
Automatic spaces & Capitals
When selected, this option will automatically add a space after any word completion or suffix, and add 2 spaces after any punctuation character. As an added convenience, after a punctuation character, the Caps Lock will engage for 1 character to allow for automatic capitalization of the next work (first word of new sentence). (See Advanced User Notes for additional features).
Automatic U after Q
This is a useful option when using WordComplete and OnScreen. When On, the character "u" is automatically sent whenever a "q" is typed.
Automatic I Capitalization
If this option is On, the single letter "i" followed by a space will automatically generate a capital I followed by a space (2 backspaces, "I", then space).
LetterAssist
When LetterAssist is enabled (checked "On"), it coordinates the available keys on the keyboard panel with the WordComplete candidates. This provides immediate feedback via the keyboard panel on which letters are valid based on the available words in the current word list. For example, if you had a very small word list of able, apple, and available, after you type the letter "a", the only letters indicated as valid on the keyboard panel would be the "b", "p", or "v".
Show Key (Grayed)
This is only available when LetterAssist is enabled. When checked "On" this shows the valid keys (i.e. letters that will build a valid word in the current word list) as normal, and invalid keys (i.e. letters that will NOT build a valid word in the current word list) as grayed (dimmed). If this is cleared (checked "Off"), the invalid keys will not be displayed at all. This mode prevents inadvertent entry by preventing key presses on keys that will not build a valid word.
Allow Grayed Key
When LetterAssist and Show Key (Grayed) are both checked "On", this option is available. When enabled, it allows typing from grayed keys, and the building of words, even if the word is not in the current word list. This allows full keyboard operation, with the grayed keys being a quick visual indicator for the next letters that will build words from the current word list.
WC-Assist (Select WC by #)
When WC-Assist is enabled (checked "On"), it provides a shortcut to the WordComplete candidates by replacing the number keys in the top row of the keyboard panel with 2 sets of keys numbered 1 through 5 (which correspond to the WordComplete candidates (also numbered 1-5 on the WordComplete panel). This feature allows quick selection of WordComplete candidates without moving off the keyboard panel to the WordComplete panel. For users that have some difficulty positioning the mouse pointer, or when moving the pointer requires discrete actions, or when moving the pointer is relatively slow, this shortcut to the WordComplete panel can be extremely helpful. When numbers are required, the Buffer key on the WordComplete panel can be pressed to clear this mode, and return the number keys to their normal operation. When WC-Assist is enabled and active, the # symbol is shown on the Buffer key, numbers are shown on the WordComplete keys, and the number keys on the Keyboard panel are taken over and colored the same as the WordComplete keys. When inactive, operation is normal, and there is no visual indication. The Buffer key toggles whether WC-Assist is active or inactive. When WC-Assist is disabled (checked "Off"), the Buffer key will not toggle these 2 modes.
Note: There is also an advanced option to replace the function keys with number keys when WC-assist is active. Refer to the KeysOnlyAssistNumbers setting in the Initialization File Documentation.
Edit Word Lists Button
Opens the Edit Word Lists Dialog box that allows you to manually edit, delete, or add to the Word Lists used within WordComplete. There is an advanced option that allows you to select existing documents, text files, and other files to build word lists & update frequencies.
OnScreen Operation
Basic (Standard)
The Basic Mode of operation provides basic options for using OnScreen and will be sufficient for most users.
Advanced
The Advanced Mode of operation provides additional features & options within all aspects of OnScreen. Macro Panels & Windows Control Panels give sophisticated users more control of Operation within Windows.
OnScreen Action Panel
This Check-Button only becomes available if you have cleared the WordComplete Active Check-Button. (The WordComplete panel includes the Action Panel). If enabled the left-most panel of OnScreen is displayed as the Action Panel which contains the Close, Setup, Select, Move, and Size buttons.
Buttons Enabled:
A check mark in these boxes indicates that the corresponding button is Enabled - clear the box to Disable the button. If you wish to prevent certain actions you can disable the button (for example, you do not wish to "Move" OnScreen, or you do not want to "Arrange" the window for typing).
These buttons offer the following short-cuts:
Back - Shortcut to the Backspace key. Erases the last character typed & back-spaces.
Size - Cycles OnScreen through 3 of the most popular sizes & auto-arranges OnScreen and the typing window.
Select - Selects the Active ApplicationActive_Application, i.e. the Window where OnScreen will type
Move - Moves OnScreen to the Top or the Bottom of the display, and resizes the Active Application.
Arrange - Sizes (Arranges) the Active Application so that it will fill the display area not used by OnScreen.
Enable Keyboard Scanning
When checked "On", this enables panel and key scanning (based on the Keyboard Scanning Settings). The primary usage of keyboard scanning is to enable a user that can only use a switch (or single mouse button) to completely operate all of OnScreen. The scanning implementation within OnScreen uses a transparent overlay to identify the scan area. There are 3 scanning levels - Panels (the individual components of the entire OnScreen display), and then groups of keys on the selected panel (rows / columns), and finally the individual keys in the selected group.
Keyboard Scanning Settings
This is available when Enable Keyboard Scanning is checked "On". This button opens the Keyboard Scanning Settings Dialog box that provides both basic and advanced options for controlling the way the keyboard scanning operates. It includes basic options like scan delay (speed of scanning), overlay display (transparency & color), and selection of panels to scan. Advanced options allow various changes to the operation, grouping and scanning order, and options for a second button (right mouse button).
Operation Options
This will open the Operation Options dialog allowing you to set your preferences while using OnScreen. These include Auto-Arrange Windows, Reacting to Dialogs and other Windows, Typematic operation, Single Keystroke per Click, Virtual Pointer, Action Button Move, and Key Border.
As seen in ...
