Some systems have a video subsystem that causes painting delays when the 3D keys are used - this is most noticeable during the Caps lock repaint. Here are some options:
- Turn off the 3D display - Go into OnScreen Setup | Appearance, and clear the checkbox for "Display 3D Keys"
- -or-
- Make sure you have the most up-to-date driver for your video adapter
- Try a different resolution and/or color depth (I.e. 16-bit/24-bit/32-bit), etc. Certain combinations may work better because of hardware & driver issues.
| Category: Using | Type: Problem/Resolution | Product: OnScreen | Version: 1.78 |
There are several possibilties using the IMG Developer's Kit - available here
OnScreen does not include the Developer's Kit by default, but it can be downloaded and unzipped as appropriate for the user/system. The DevKit sub-folder has useful utilities for manipulating the keyboard externally - specifically the FWCTLMTS.EXE (Find Window and Control), MINMZMTS.EXE (Minimize), OPEN_MTS.EXE (Open).
In the DevKit folder, the FWCTLMTS.EXE is designed to toggle OnScreen (My-T-Soft Family) off-screen (not visible)/ on-screen (visible). By creating a shortcut to this utility on the user's desktop, then go into the shortcut properties, you can add a Shortcut key (e.g. Ctrl-Alt-X) to trigger the shortcut itself. Then when a Ctrl-Alt-X occurs (via physical keyboard or OnScreen), the OnScreen keyboard window will be toggled "off-screen". Press Ctrl-Alt-X to bring it back. Ctrl-Alt-X will toggle access to OnScreen & control the screen real estate as desired by the user.
Alternatively, using a Minimize/Open (MINMZMTS.EXE / OPEN_MTS.EXE) approach with 2 different shortcuts (e.g. Ctrl-Alt-A / Ctrl-Alt-Z) can perform the same general operation, but leaves the software available in its minimized state.
| Category: Using | Type: Problem/Resolution | Product: OnScreen | Version: 1.78 |
Refer to available updates - see OnScreen Setup | Help | Check for Updates , and look at options available for the OnScreen product. It is indicated as "OnScreen Logon Utilities for 64-bit Windows" (This is not tagged as a recommended update because this update only applies to 64-bit versions - you must manually select OnScreen, and the update, and answer Yes when notified that is the same as the current installation).
You can also download this update directly here: Download Update for OnScreen 1.78 Release 4 for 64-bit Windows 7/Vista (197 KB) (MD5: 8A38ADDC2814DA5505CD30FF30585C34)
Installation/udpate instructions:
Make sure the OnScreen Logon Utilities are closed - no OnScreen program should be running
Then, as Administrator, copy ons17864.exe to \Program Files (x86)\ONSCREEN, then execute directly from that folder.
This will expand and update:
IMGLOGON.exe and IMGVistaLogon.dll
and will add:
IMGVERS64.DLL and LICENSE64.DLL
Technical notes: The Credential Provider DLL must be compiled as 64-bit to be loaded by the operating system. Also, the user front-end IMGLOGON.exe must be 64-bit to update the correct registry keys (vs. the 32-bit redirects in the Wow6432Node sub keys). To resolve interface issues, supporting DLLs must also be 64-bit.
Once the update/new files have been applied, you can run the OnScreen Logon Utilities directly, and it will operate correctly in the 64-bit environment.
| Category: Using | Type: Problem/Resolution | Product: OnScreen | Version: 1.78 |
With standard defaults, all user data (ONSCREEN.INI/KEYBOARD.KBF/Macro files) are saved in the Application Data area for the current user (for each user). For tools to find / Export / Import, use the File menu in OnScreen Setup. You can refer to the general information in the help for OnScreen Setup for details. When exported, all user data is compressed to a single zip file that is saved on to the desktop. This file can be saved/moved to a new system/installed version and used to import the old settings to the new installation of OnScreen. It is also a good idea to use this as a way to backup settings once you have everything configured the way you like it, and for people that invest a lot of time building macros.
| Category: General | Type: Question/Answer | Product: OnScreen | Version: 1.78 1.79 1.80 |
You have Text-To-Speech enabled, with "Speak Key under pointer" selected. Unfortunately this Text-To-Speech feature can only be used the with standard US 101 layout. This will be addressed in the UpdateLevel 1 release for the 1.78 version of OnScreen.
| Category: Using | Type: Question/Answer | Product: OnScreen | Version: 1.78 |
There is an INI only setting to control this - refer to the IgnoreSystemCapsLock in the ONSCREEN.INI. You can refer to the 6 different options at the OnScreen Initialization File Documentation The default is to mimic the actual physical setting, so the physical keyboard and OnScreen remain in sync.
| Category: Using | Type: Question/Answer | Product: OnScreen | Version: 1.78 |
This is the ScanKeyboardAlpha setting in the INI file. If a whole row is indeed hidden, then its "key set" can be removed from the ONCSREEN.INI (e.g. the top row, remove the 1-13; section)
So the
ScanKeyboardAlpha=[Function Keys]1,2,3,4,5,6,7,8,9,10,11,12,13; [Numbers]14,15,16,17,18,19,20,21,22,23,24,25,26,27; [Q row]28,29,30,31,32,33,34,35,36,37,38,39,40,53; [Home row]41,42,43,44,45,46,47,48,49,50,51,52,54; [Shift row]55,56,57,58,59,60,61,62,63,64,65,66,67; [Final row]68,69,70,71,72
Becomes
ScanKeyboardAlpha=[Numbers]14,15,16,17,18,19,20,21,22,23,24,25,26,27; [Q row]28,29,30,31,32,33,34,35,36,37,38,39,40,53; [Home row]41,42,43,44,45,46,47,48,49,50,51,52,54; [Shift row]55,56,57,58,59,60,61,62,63,64,65,66,67; [Final row]68,69,70,71,72
You can refer to the OnScreen Initialization File Documentation for further details. The best way to access/edit the INI is through the OnScreen Setup | User Options | Advanced, and then Appearance | Special Options | Edit initialization file.
| Category: Using | Type: Question/Answer | Product: OnScreen | Version: 1.78 |
No, the Alt-X on the physical keyboard sends Alt-X to the App with focus - in these apps, it generates the Hex value of the character at the text caret. Other Apps may have menu or keyboard shortcuts that also use Alt-X - here are some options:
There is has a [Cancel = Alt-X] area on the "switch to scan" image, which can be clicked with the mouse to cancel scanning.
OnScreen is actually monitoring the keyboard (rather than reacting to a keystroke), so if you actually are using an App that uses Alt-X, try Ctrl-Alt-X (seems to work fine in WordPad) - this bypasses the Alt-X combo in the App, but the Alt-X is seen as "down" by OnScreen, so you do not get the hex characters, but OnScreen cancels scanning.
Use Win-D to show your desktop, then Alt-X to cancel scanning.
The problem specifically is that OnScreen doesn't "take over" the physical keyboard, since it works in conjunction with the physical keyboard. A lot of work has gone into making OnScreen an enhancement, and NOT changing the way your system would operate normally. Since this is a normal operation of the App, it is simply a conflict with using Alt-X to cancel scanning. Refer to the options above for possible solutions.
| Category: Using | Type: Question/Answer | Product: OnScreen | Version: 1.78 |
For a user that has right-click ability, the best solution is to use the "Up one Scanning level " in the Keyboard Scanning Settings dialog. To access this, make sure the "Show All Options " is checked On, and then in Right-Click, select "Up one Scanning level " - see Keyboard Scanning Settings for notes.
Once this is selected, using the Right-Click over OnScreen will go up a level of scanning - when stopped in scanning mode, the Right-Click frees the cursor and places a small window on the outside of OnScreen that says "Left Click here to Start Scanning "
In use, this allows the user to optionally work outside of scanning mode, and then quickly and easily drop back into it.
| Category: Using | Type: Question/Answer | Product: OnScreen | Version: 1.78 |
If the version you are running does not have a Font button, you can download the update, or refer to the notes below for options.
To download TTSAPP.exe with Font button/Font support, select zip or exe and follow instructions.
Download TTSAPP.exe (820KB) (MD5: 480d4dd57627bfaa14f2bf844b46b22f) 9/13/2013
Download TTSAPP.exe as Zip TTSAPP.zip (72KB) (MD5: 050307397c304a7f53e6798c62b8d643) 9/13/2013
Work with new version - Select Font as desired. Last selected Font will be used when opening Text-To-Speech
- Download selected file and note download location
- If zip, right-click, and Extract all to obtain TTSAPP.exe
- As Administrator, rename TTSAPP.exe in \Program Files\ONSCREEN or \Program Files\OnScreen with CrossScanner as TTSAPP.old
- Copy new TTSAPP.exe from download location into appropriate \Program Files location
- Notes
- Font information is saved in TTSAPP.INI, which is saved in same folder as TTSAPP.exe - for newer versions of windows, actual file will be in Virtual Store location for user - see \Users\[User]\AppData\Local\VirtualStore\Program Files\ONSCREEN, etc.
- This update will roll into any future releases that are created from new builds
If using the older one without font support, you can refer to the following:
Now if you type/work with the text box, it should preserve the pasted font info.
- Open WordPad (Start | type "wordpad" | Enter, or Programs | Accessories | WordPad)
- Select a font/size/bold that is easy to read.
- Type some text
- Select All/Copy (Ctrl-A | Ctrl-C)
- Switch to Text-To-Speech utility
- Paste into text area - it should keep the font
| Category: Using | Type: Question/Answer | Product: OnScreen | Version: 1.78 1.79 1.80 |
There is no comprehensive way to build arbitrary keystroke macros similar to Shift or Ctrl macros. When you use a macro with the keystroke (e.g. [Insert]), it generates a down/up complete keystroke, so [Insert][Down] will generate an insert key then a down arrow key, i.e. Insert-Down Insert-Up Down Arrow-Down Down Arrow-Up. To do a shifted Down Arrow, you would use the macro [Shift-Down][Down][Shift-Up]. If you need an Insert-Down Down Arrow-Down Down Arrow-Up Insert-Up, something custom is required (i.e. there is no way in current versions of the software to create such a macro).
You can download a set of Executables that generate an Insert-Up Arrow, Insert-Down Arrow, Insert-Left Arrow, Insert-Right Arrow set of macros (4 executable files named KEYINS-UP.EXE, KEYINS-DOWN.EXE, KEYINS-LEFT.EXE, KEYINS-RIGHT.EXE). These generate the following sequence:
Insert-Down [Arrow]-Down [Arrow]-Up Insert-Up
Download Key Insert Macros in keyinsertmacros.zip (64KB) (10/11/2013) (MD5: 97906D2FD28455182FB3334886D49D47)
Download and then Extract, then as Administrator, copy into \Program Files\ONSCREENTo use with OnScreen (or My-T-Soft/etc.) you can use the Key Options or a macro panel. To Use the Key Options, refer to the following steps:
1) In OnScreen Setup, make sure the Advanced option is set under User Options
2) Then go into Appearance | Key Options
3) Select an appropriate function key for the Macro executable in the Key drop down (e.g. F12)
5) Click on Disable Keystroke (you do not want to send the function key keystroke - this will undoubtedly cause different problems in different situations)
6) Click on Launch Key Executable.
7) Browse and select the KEYINS-DOWN.EXE file (e.g. C:\Program Files\ONSCREEN\KEYINS-DOWN.EXE)
8) Select Ok | Ok and Exit OnScreen Setup
Now when you run OnScreen, the F12 key will generate the Insert-Down Arrow macro.Notes:At some point, the macro language will expand to allow down/up and latching type operation on arbitrary keys similar to the current Shift/Ctrl/Alt handling. Until that point, custom macros may be necessary if there are not options with the application to perform a keystroke macro. Note that menu options can all be accessed with the existing macro system, e.g. Alt-F, O for File | Open is simply [Alt-Down]f[Alt-Up]o.
You may want to reference other details/options/notes about the Key Options - see Item QU1106120501
If you have a special situation that you cannot resolve with the above information, please contact IMG Technical Support.
| Category: Using | Type: Question/Answer | Product: OnScreen | Version: 1.78 1.79 1.80 |
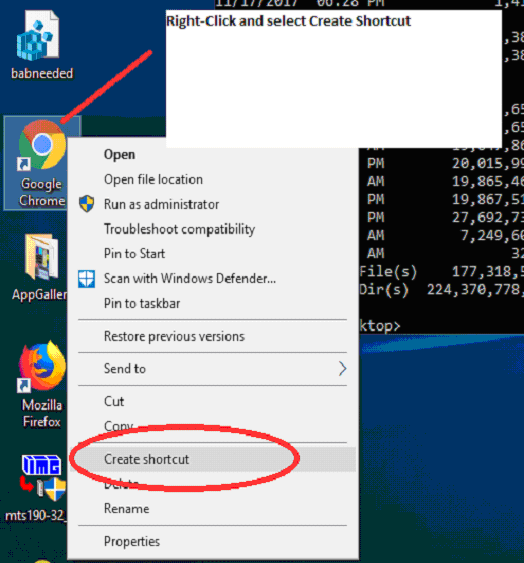
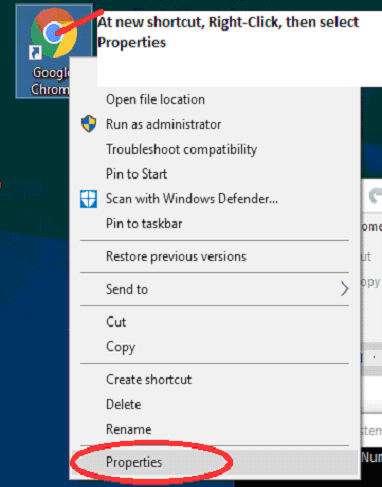
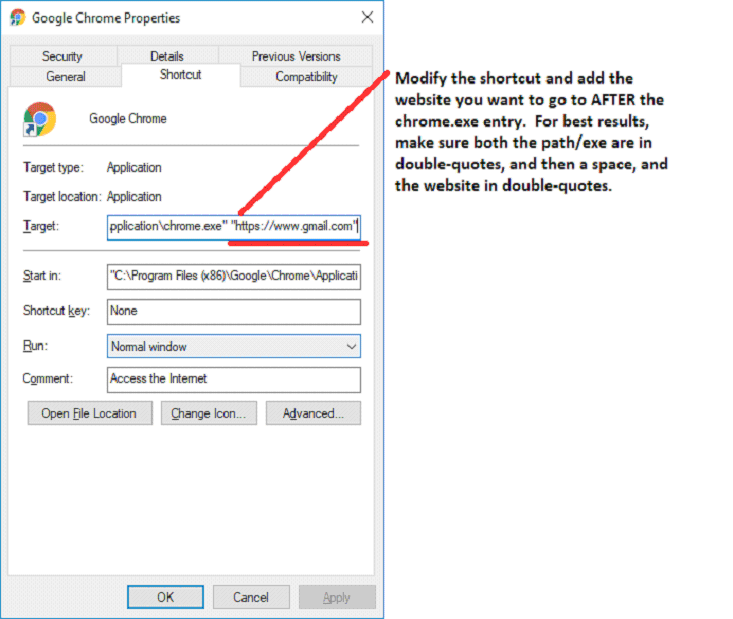
Shortcuts can be used in place of launching an EXE, but care must be used in setting up shortcut and referencing the actual shortcut file. The following example walks through creating the shortcut, configuring the shortcut, determining the exact shortcut link file name (.lnk file), and setting up a Macro Panel to open and launch the shortcut.
At this point, you can test the shortcut by double-clicking on the modified desktop shortcut - it should open the page you specified - if necessary, modify until shortcut performs desired action.
Now run CMD (Command prompt) and change to Users, [UserName], Desktop, e.g.
(Here user is the User name - yours is your login/user name)
cd \Users\user\Desktop[Enter]
Then type dir[enter] to list files. Verify .lnk name to use in Macro.
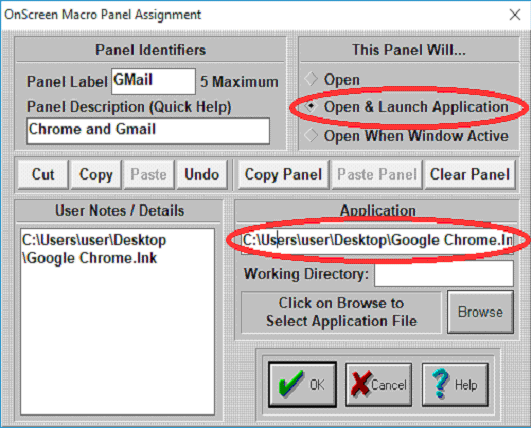
Here, exact file is: \Users\user\Desktop\Google Chrome.lnk
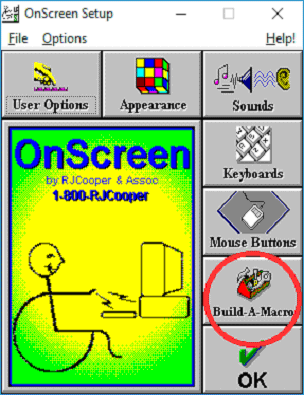
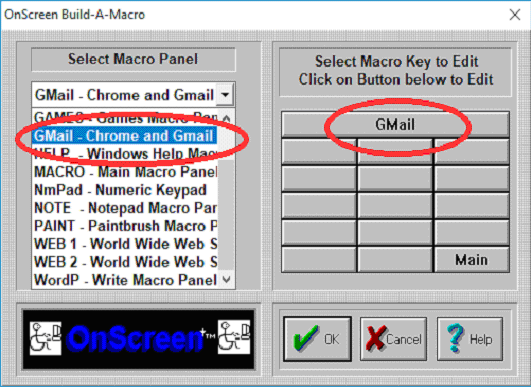
Now run OnScreen Setup, go into Build-A-Board, select Panel, set to Open & Launch Application, and enter this file/shortcut link.
Now when this panel opens, it will open chrome with web page desired
| Category: Using | Type: Question/Answer | Product: OnScreen | Version: 1.78 1.79 1.80 |
Notes:
As seen in ...